DIY Emblem Removal: Heat, Fishing Line & Adhesive Remover Explained.
This section teaches you how to remove car emblems safely. You'll learn to keep your car's paint shiny and clean. We'll cover methods that use heat, fishing line, and special adhesive removers from 3M.

Removing emblems is simple and careful. Use a heat gun to warm the foam tape, not the paint. Then, gently saw the emblem with fishing line.
For the final step, use a plastic trim tool to remove the emblem. Avoid using metal tools to prevent scratches. If you plan to put back the emblem, use painter’s tape to mark the spot.
This guide also talks about using 3M remover, light heat, or a pinstripe wheel. If old emblems leave marks, a mild buffing compound can fix it. These tips help you prepare for new styling and know when to call professionals.
By the end, you'll know how to remove emblems safely. You'll have a clean surface ready for new badges or a sleek look.
Why Debadge: Cleaner Look, Prep for Gloss Black Replacements
Clean panels let body lines do the talking. Removing busy dealer decals and mixed finishes brings a calm, modern profile. Use smart care to remove car emblems without damaging paint, and you’ll set the stage for a factory-level refresh.
Done right, debadging also primes the surface for a uniform update. This makes it easier to align new pieces and keep symmetry across the trunk, grille, and fenders.

Benefits of debadging for a sleeker appearance
Simpler panels reduce visual noise and highlight the design, whether it’s a BMW 3 Series, Ford F-150, or Tesla Model 3. You gain a cleaner reflection, less dirt buildup around edges, and fewer mismatched metals.
- Sharper silhouette that photographs better in any light.
- Less wax and polish snagging on edges after washes.
- Easier path to upgrades with tips for debadging your car woven into the plan.
Creating space for Mesh Autoparts & Accessories gloss black full emblem set
Clearing old badges gives you precise real estate for a gloss black full emblem set. If you prefer a darker tone, the Mesh Autoparts gloss black emblem set brings a unified finish front to back.
Use painter’s tape to mark OEM locations before removal so the new pieces sit square. This step keeps spacing tight and the look intentional.
| Goal | Why It Matters | What to Consider |
|---|---|---|
| Cleaner look | Reduces clutter and elevates paint depth | Plan to remove car emblems without damaging paint |
| Modern uniformity | Matches trim with a single tone | Choose a gloss black full emblem set for consistent color |
| Easy alignment | Keeps badges straight and evenly spaced | Record positions before debadging for fast install |
| Future flexibility | Allows quick swap to seasonal or special badges | Follow tips for debadging your car to protect the clear coat |
When badges may have alignment pins and what that means for holes
Many small emblems use foam tape only. Larger pieces—like some trunk emblems on Toyota, Chevrolet, or Mercedes-Benz—can include alignment pins. If pins are present, holes will remain when the badge comes off.
Feel for hard stops with fishing line before you pull. If you detect pins, plan to reuse a matching emblem that fits those holes or work with a body shop to fill and refinish. Long-installed parts may leave faint outlines that a light polish can blend.
Safe Emblem Removal Methods: Heat Gun, Fishing Line, Plastic Pry Tools
These methods protect your car's paint and trim. They also help you keep control. The guide below uses gentle heat, light pressure, and clean pulls. This way, the clear coat stays intact on cars from Ford and Toyota to BMW and Tesla.

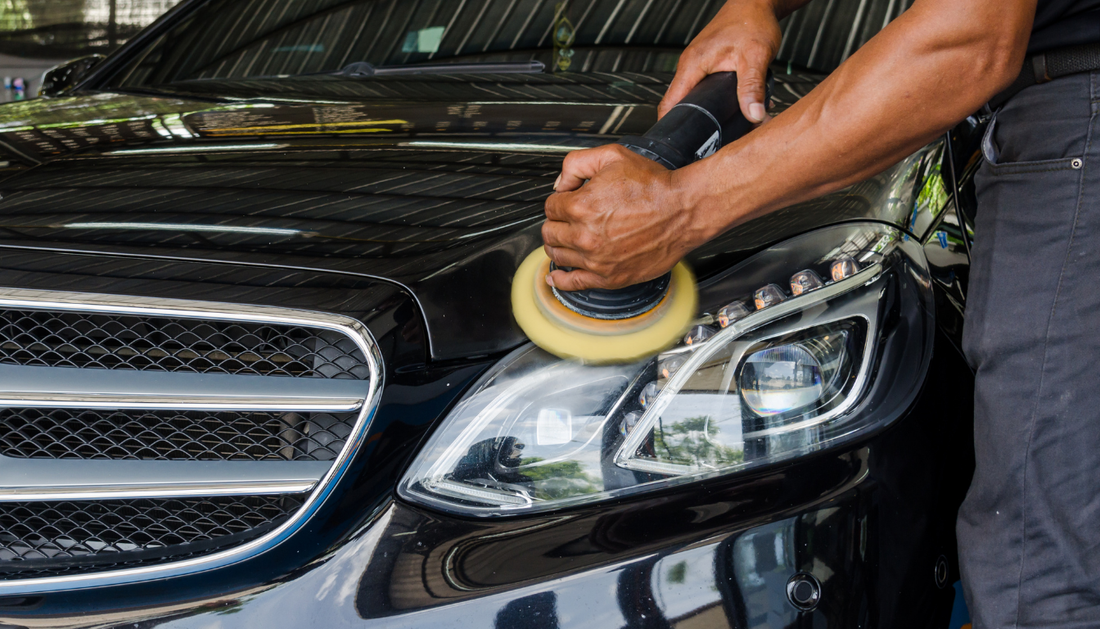
Debadging with heat gun and fishing line to protect clear coat
Use controlled, moving heat to soften the adhesive. Keep the heat gun sweeping; never park it in one spot. After warming, slide fishing line or dental floss behind the badge and “saw” in short strokes. This method—debadging with heat gun and fishing line—cuts the foam layer without prying into paint.
If the line hits rigid resistance, pause. Large emblems from brands like Chevrolet or Honda may use alignment pins. Let heat and motion do the work to avoid lifting the clear coat.
Using a plastic trim tool instead of metal to avoid scratches
For small letters, lift only the edge with a plastic trim tool. Metal picks or flatheads can gouge paint and chrome. A nylon or polycarbonate tool flexes, slides under the adhesive, and pairs well with these safe emblem removal methods.
Keep strokes shallow. Work slow and rewarm as needed to prevent marring.
Painter’s tape as a position reference before removal
Before you start, apply painter’s tape along the top and sides of the emblem. The outline saves the factory position, which helps when installing a gloss black replacement from Mesh Autoparts or a similar kit. This simple step streamlines the debadge car DIY guide and keeps alignment consistent.
How to remove car decals cleanly with controlled heat
Warm dealer stickers or vinyl decals with a gentle pass of heat, then peel by hand at a low angle. That’s how to remove car decals cleanly without tearing. Any light residue can be wiped away with a soft cloth and an automotive adhesive remover from 3M.
Stay patient and keep the heat moving. The surface will release as the adhesive relaxes, and the paint remains safe.
Remove car emblems without damaging paint, Gloss Black Full Emblem Set
To Remove car emblems without damaging paint, use controlled heat and non-marring tools. Be patient and break down the adhesive slowly. Keep the heat gun moving to avoid overheating.
Test the temperature by touch. This method works well on clear coats from brands like Audi, BMW, Ford, and Toyota.
When cutting foam tape, use fishing line or floss carefully. For lifting edges, use a plastic trim tool, not metal. Apply adhesive remover to soften the residue, then remove it with a microfiber or plastic razor.
Avoid hard scrubbing to prevent scratches. After removing the badge and residue, clean the area with a panel-safe cleaner. Check under bright light for any remaining outlines or haze.
If there's faint ghosting, a light buffing with a fine compound can help. Once the surface looks even, it's ready for a bold upgrade.
Complete the look with a Gloss Black Full Emblem Set that fits the factory contours. The Mesh Autoparts gloss black emblem set offers clean edges and OEM-style adhesion. This ensures a crisp and aligned finish.
Adhesive Breakdown: Best Car Emblem Adhesive Removers and Techniques
Clean badge removal starts with the right chemistry and a light touch. Choose products known as the best car emblem adhesive removers. Pair them with patient technique. This keeps paint safe while you learn how to remove car decals cleanly on any clear coat.
Use care with chemicals. Avoid acetone or paint stripper, which can haze or stain finishes. Stick with the best adhesive remover for car badges (3M). Keep the surface moist, not flooded, so the glue relaxes without swelling trim.
Best adhesive remover for car badges (3M) and dwell-time basics
Apply a small amount to a soft microfiber and let it dwell so the foam and glue soften. Re-wet as needed and work in sections. The best car emblem adhesive removers reduce effort and help you maintain control. This is vital when you want to remove car decals cleanly without dull spots.
Heat-soften vs. soak-and-roll methods for foam tape residue
Two paths work well. Heat-soften: use brief, low heat to relax the adhesive, then lift gently with a plastic trim tool. Soak-and-roll: keep the area damp with the best adhesive remover for car badges (3M), then roll residue away with a finger wrapped in cloth for a slow, safe peel.
Remove 3M VHB tape residue car: cloth wipe, plastic razor, and patience
To remove 3M VHB tape residue car panels, cycle small doses of remover with light cloth wipes. Ease edges with a plastic razor at a shallow angle. Reapply, then roll the softened foam. Short, repeated passes beat hard scraping and preserve the gloss. Finish with a clean wipe to clear haze.
Pinstripe/decal removal wheel: when and how to use lightly
If residue lingers, a pinstripe wheel on a drill can help after a short dwell with remover. Keep pressure light and move like an eraser to avoid heat buildup. This complements the best car emblem adhesive removers and supports how to remove car decals cleanly on modern clear coats.
Step-by-Step: Debadge Car DIY Guide from Start to Shine
This guide shows you how to safely remove car emblems. It works on clear coats from Ford to BMW. You'll learn how to do it without damaging the paint and get tips for a clean job.
Surface prep, masking, and controlled heating patterns
First, wash and dry the panel to avoid scratches. Use painter’s tape to mark the badge area. Warm the emblem with a heat gun or hair dryer, moving smoothly to avoid damage.
Fishing line or floss “sawing” motion to cut foam core
Use fishing line or waxed floss to cut the foam tape. For separate letters, use a plastic trim tool to lift and twist, not pry. This method helps avoid paint damage.
Adhesive residue removal without marring the finish
After removing the emblem, choose a gentle method. Apply adhesive remover to a microfiber cloth and keep it wet. For tough glue, add brief heat and lift with a plastic razor. Avoid using metal tools and scrubbing.
Buffing compound to blend outlines or minor marring
After cleaning, check for ghosting from UV fade. Use a light buffing compound on a foam pad to fix minor marks. If there are holes from alignment pins, fix them before adding a new badge. Finish with a clean wipe to prepare the surface.
Tools and Supplies: Car Emblem Removal Tools That Work
Choose gear that guards the clear coat and keeps control in your hands. You'll need a variable heat gun, fishing line or dental floss, and plastic trim tools or plastic razor blades. These tools help soften adhesive, cut through foam tape, and lift edges without scratching.
For safe emblem removal, use painter’s tape to mark positions and protect nearby paint. Also, have a quality adhesive remover like 3M Adhesive Remover ready. Use soft microfiber or clean cotton cloths to dissolve and wipe away glue gently.
When residue is stubborn, use a pinstripe or decal removal wheel after the remover has worked for a while. A mild buffing compound can help blend faint outlines after removing badges. These steps focus on plastic contact points, steady heat, and patience to keep the gloss.
Many prefer using a heat gun and fishing line for debadging. The line “saws” through the foam core while the warmed adhesive lets go cleanly. Finish with a gentle wipe and a brief polish to even the finish.
Install After Debadging: Blackout Badge Kit and Alignment Tips
Now that the surface is clean and flat, it's time to add a fresh look. Use an emblem removal kit + gloss black replacement for a sharp finish. A Mesh Autoparts gloss black emblem set or a full kit from trusted brands will give you a uniform look and strong adhesion.
Emblem removal kit + gloss black replacement options
Choose the right pieces for your trim and model year. Dry-fit each badge to check size and shape. The Gloss Black Full Emblem Set ensures a consistent look across all locations.
Blackout badge kit after debadging: surface prep and adhesion
Wipe the panel with isopropyl alcohol and let it dry completely. For a blackout badge kit, align each piece lightly first. Then apply even pressure to ensure good adhesion. Avoid moisture during the initial cure.
Gloss black full emblem set install tape pattern for consistency
Use painter's tape to guide the installation of the Gloss Black Full Emblem Set. Create a baseline and centerline to ensure even spacing. This method helps keep the Mesh Autoparts emblem set straight and uniform.
Badge alignment and spacing guide (Audi rings) principles
For multi-piece designs, use a badge alignment guide. Mark the center and edges, then install each piece in sequence. Keep even gaps and check with your tape grid before applying final pressure. The Gloss Black Full Emblem Set looks best when installed symmetrically.
Finish by checking each edge for full contact. If needed, apply gentle pressure to secure the bond. This method protects the clear coat and enhances the look of the Mesh Autoparts emblem set.
Pro Tips, Safety, and When to Call Professional Emblem Removal Services
Work in the shade on a cool-to-the-touch panel to control heat and adhesive. Keep the heat gun moving, and test by hand—warm is enough. Start with the least aggressive tools: fishing line or floss, then a plastic trim tool. A lightly used decal removal wheel is a last resort. Apply adhesive remover to a cloth, not the paint, and let it dwell so the chemistry does the heavy lifting. These tips for debadging your car help you remove car emblems without damaging paint and set you up for a clean result.
If a badge will not budge or you feel a hard stop, pause and assess for alignment pins. Pins can mean holes that may need refinishing or a pinned replacement to seal the panel. Old emblems often leave a faint outline; plan a light polish to blend the area. Use controlled heat and gentle “sawing” with line to avoid tearing the clear coat, and keep wipe-downs clean so you can see progress and know how to remove car decals cleanly.
Call professional emblem removal services if you lack the tools, are uneasy with heat, or suspect pins in a painted bumper or trunk lid. It is also smart to get help when panels show heavy oxidation, blend lines, or delicate repaints. A skilled tech can remove car emblems without damaging paint, finish the polish step, and reinstall a pinned badge if needed. When in doubt, these tips for debadging your car guide the process—and a pro ensures how to remove car decals cleanly is more than a guess.
FAQ
What are the safest ways to remove car emblems without damaging paint?
Use a heat gun to warm the area gently. Then, slide fishing line or dental floss behind the emblem. Lift it with plastic tools or blades, never metal. Keep the panel warm, not hot, to avoid damage.
Why should I debadge my car?
Debadging makes your car look cleaner and sleeker. It also prepares the surface for new styling. This makes it easier to align and stick new emblems.
How do I know if a badge has alignment pins, and what happens if I remove it?
If you feel hard stops when cutting, it might have pins. Removing a pinned emblem can leave holes. If you find pins, use a replacement that fits or get a professional to fix it.
How do I debadge with a heat gun and fishing line?
Work in a cool, shaded area. Move the heat gun to warm the paint, not scorch it. Use fishing line or floss to cut the foam tape gently. Lift the emblem carefully with plastic tools.
Can I use metal tools to pry off emblems?
No. Metal tools can scratch the paint. Use plastic tools, blades, and soft microfiber instead. Gently twist to avoid marring the surface.
How can painter’s tape help with emblem removal and reinstallation?
Apply painter’s tape around the emblem before removing. This marks the OEM position. Use these lines to reinstall a new emblem set in the right spot.
How do I remove dealership decals cleanly?
Warm the decal with heat and peel it slowly. Keep it wet with remover and wipe with a soft cloth. For stubborn edges, use a plastic razor with light pressure.
What’s the best adhesive remover for car badges and how should I use it?
Use a dedicated automotive remover like 3M. Apply a small amount to a cloth and keep it wet. This softens the tape for easy removal. Repeat as needed for control.
What’s the difference between heat-soften and soak-and-roll for residue?
Heat-soften warms the residue for easy removal with a plastic tool. Soak-and-roll keeps the area wet and rolls the tape away. Both methods avoid harsh scraping.
How do I remove 3M VHB tape residue on a car without scratching?
Apply 3M remover, let it dwell, then roll the residue with a cloth. Reheat as needed. Keep pressure light to avoid marring.
When is it safe to use a pinstripe/decal removal wheel?
Use it for stubborn residue after remover has worked. Move the wheel slowly and lightly. Test on a hidden spot first and avoid new paint.
What are the steps for a DIY debadge from start to finish?
Clean the panel and mark positions with tape. Warm the emblem with heat and cut behind it with fishing line. Remove residue with remover and plastic tools. Finish with a light buffing compound if needed.
How do I avoid marring the finish when removing adhesive?
Start with the least aggressive method. Keep the residue wet and use soft cloths and tools. Avoid dry rubbing to prevent damage.
What if there’s a faint outline or haze after badge removal?
This is called ghosting, often from UV exposure. A light buffing can blend the outline. Follow with a wipe and sealant after adhesives cure.
What tools and supplies do I need for paint-safe debadging?
You'll need a heat gun, fishing line, plastic tools, and a dedicated remover like 3M. Also, soft cloths, a mild buffing compound, and an emblem removal kit are helpful.
How do I prep for installing a blackout badge kit after debadging?
Ensure the surface is flat, clean, and dry. Dry-fit the badge, then use painter’s tape for alignment. Press evenly to wet-out the adhesive and cure for a strong bond.
What’s the correct way to align a gloss black full emblem set?
Use a centerline tape and level guides. For multi-piece designs, mark the center and outer extents. Place each piece slowly and evenly for uniform spacing.
Can I replace factory badges with Mesh Autoparts & Accessories gloss black emblems?
Yes. After debadging and cleaning, install the Mesh Autoparts & Accessories set. Use painter’s tape marks for OEM positions for a modern look.
What if my emblem used alignment pins—can I stil install replacements?
Choose a replacement with the same holes or consult a professional. They can fill and refinish the holes for a new badge.
When should I consider professional emblem removal services?
If you suspect pins, the panel has heavy oxidation, or you're unsure, a professional can help. They ensure a flawless finish without damage.
Are there quick tips for beginners debadging a car?
Work in shade and test the panel's temperature. Use fishing line and plastic tools, and apply remover to a cloth. Be patient to avoid paint damage.
